A Nail Art/Nail polish blog by a really nerdy software Engineer

Thursday, 26 October 2023

It's In The Cards // Tarot Halloween Nails

It's In The Cards Tarot Halloween Nails using China Glaze Maniology

This was a fiddly design and I need waay more practice with layering stamps that are straight lines. This didn't turn out exactly how I wanted but it's close enough and I think it looks ok.

It's In The Cards Tarot Halloween Nails using China Glaze Maniology

I feel like the tarot cards themselves need more colour on them. I started off with 2 layers of Cowboy Bye, then stamped in this order:
  1. Card background using Cafe au Lait
  2. Tarot design using Smokey
  3. Card borders using Bright Lights
Then added a layer of smudge proof top coat followed by a matte top coat.

It's In The Cards Tarot Halloween Nails using China Glaze Maniology

It's In The Cards Tarot Halloween Nails using China Glaze Maniology

Polishes/Tools Used:
Base:
- China Glaze // Cowboy, Bye (dark brown holographic)

Stamping:
- MoYou London // Cafe au Lait (light beige)
- Twinkled T // Smokey (dark grey)
- Barry M Liquid Chrome // Bright Lights (gold)
- Maniology // M072 Stamping Plate

Top:
- MoYou London Smudge Proof Top Coat
- Barry M // Matte Top Coat
SHARE:

Friday, 13 October 2023

Neon Halloween // Neon Orange & Black Pumpkin Carving Design

Neon Halloween // Neon Orange & Black Pumpkin Look

A super quick halloween look! Not spooky in the slightest but perfect for nights out when you have about 20 minutes to do your nails.

This involved 2 coats of Paradise City followed by the designs stamped with Neither Noir with a matte top coat on top. And that's it!

Neon Halloween // Neon Orange & Black Pumpkin Look

Neon Halloween // Neon Orange & Black Pumpkin Look

Polishes/Tools Used:
Base:
- Cuccio Colour // Paradise City (orange)

Stamping:
- What's Up Nails // Neither Noir (black)

Top:
- MoYou London // Smudge Proof Top Coat
- Barry M // Matte Top Coat


SHARE:

Wednesday, 11 October 2023

Honey Flowers // Beige Autumnal Flower Design

Honey Flowers // Beige Autumnal Flower Design

Another look that came about whilst swatching the Nails Inc Nail Spice collection! This was a super quick one. Just 2 layers of Honey Lane, followed by designs stamped on with Smokey and Bright Lights, then a layer of smudge proof top coat and matte top coat.

Honey Flowers // Beige Autumnal Flower Design

Polishes/Tools Used:
Base:
- Nails Inc // Honey Lane (pink beige)

Stamping:
- Twinkled T // Smokey (dark grey)
- Barry M Liquid Chrome // Bright Lights (gold)
- MoYou London // Botanical 16 Stamping Plate

Top:
- MoYou London // Smudge Proof Top Coat
- Barry M // Matte Top Coat


SHARE:

Wednesday, 27 September 2023

Tropical Terracotta // Tropical Leaves with Nude Background

Tropical Terracotta // Tropical Leaves with Nude Background

This look was inspired by a painted plant pot I saw on pinterest! I was swatching some new Barry M shades I got and I thought Honeysuckle would make the perfect background for the dark blue and white and I was right! It's just neutral and soft enough to provide the perfect contrast.

Tropical Terracotta // Tropical Leaves with Nude Background


I started off with Honeysuckle as the base then stamped on the designs from one my favourite paradise plates. Followed by some gold dots and topped off with a matte top coat.

Tropical Terracotta // Tropical Leaves with Nude Background

Tropical Terracotta // Tropical Leaves with Nude Background

Polishes/Tools Used:
Base:
- Barry M Gelly Hi-Shine // Honeysuckle (terracotta)

Stamping:
- MoYou London // Midnight Madness (dark blue)
- Twinkled T // Glow Up (white)
- L'Oreal Color Riche // L'Or (gold)
- MoYou London // Paradise 01 Stamping Plate

Top:
- Barry M // Matte Top Coat
 
SHARE:

Tuesday, 26 September 2023

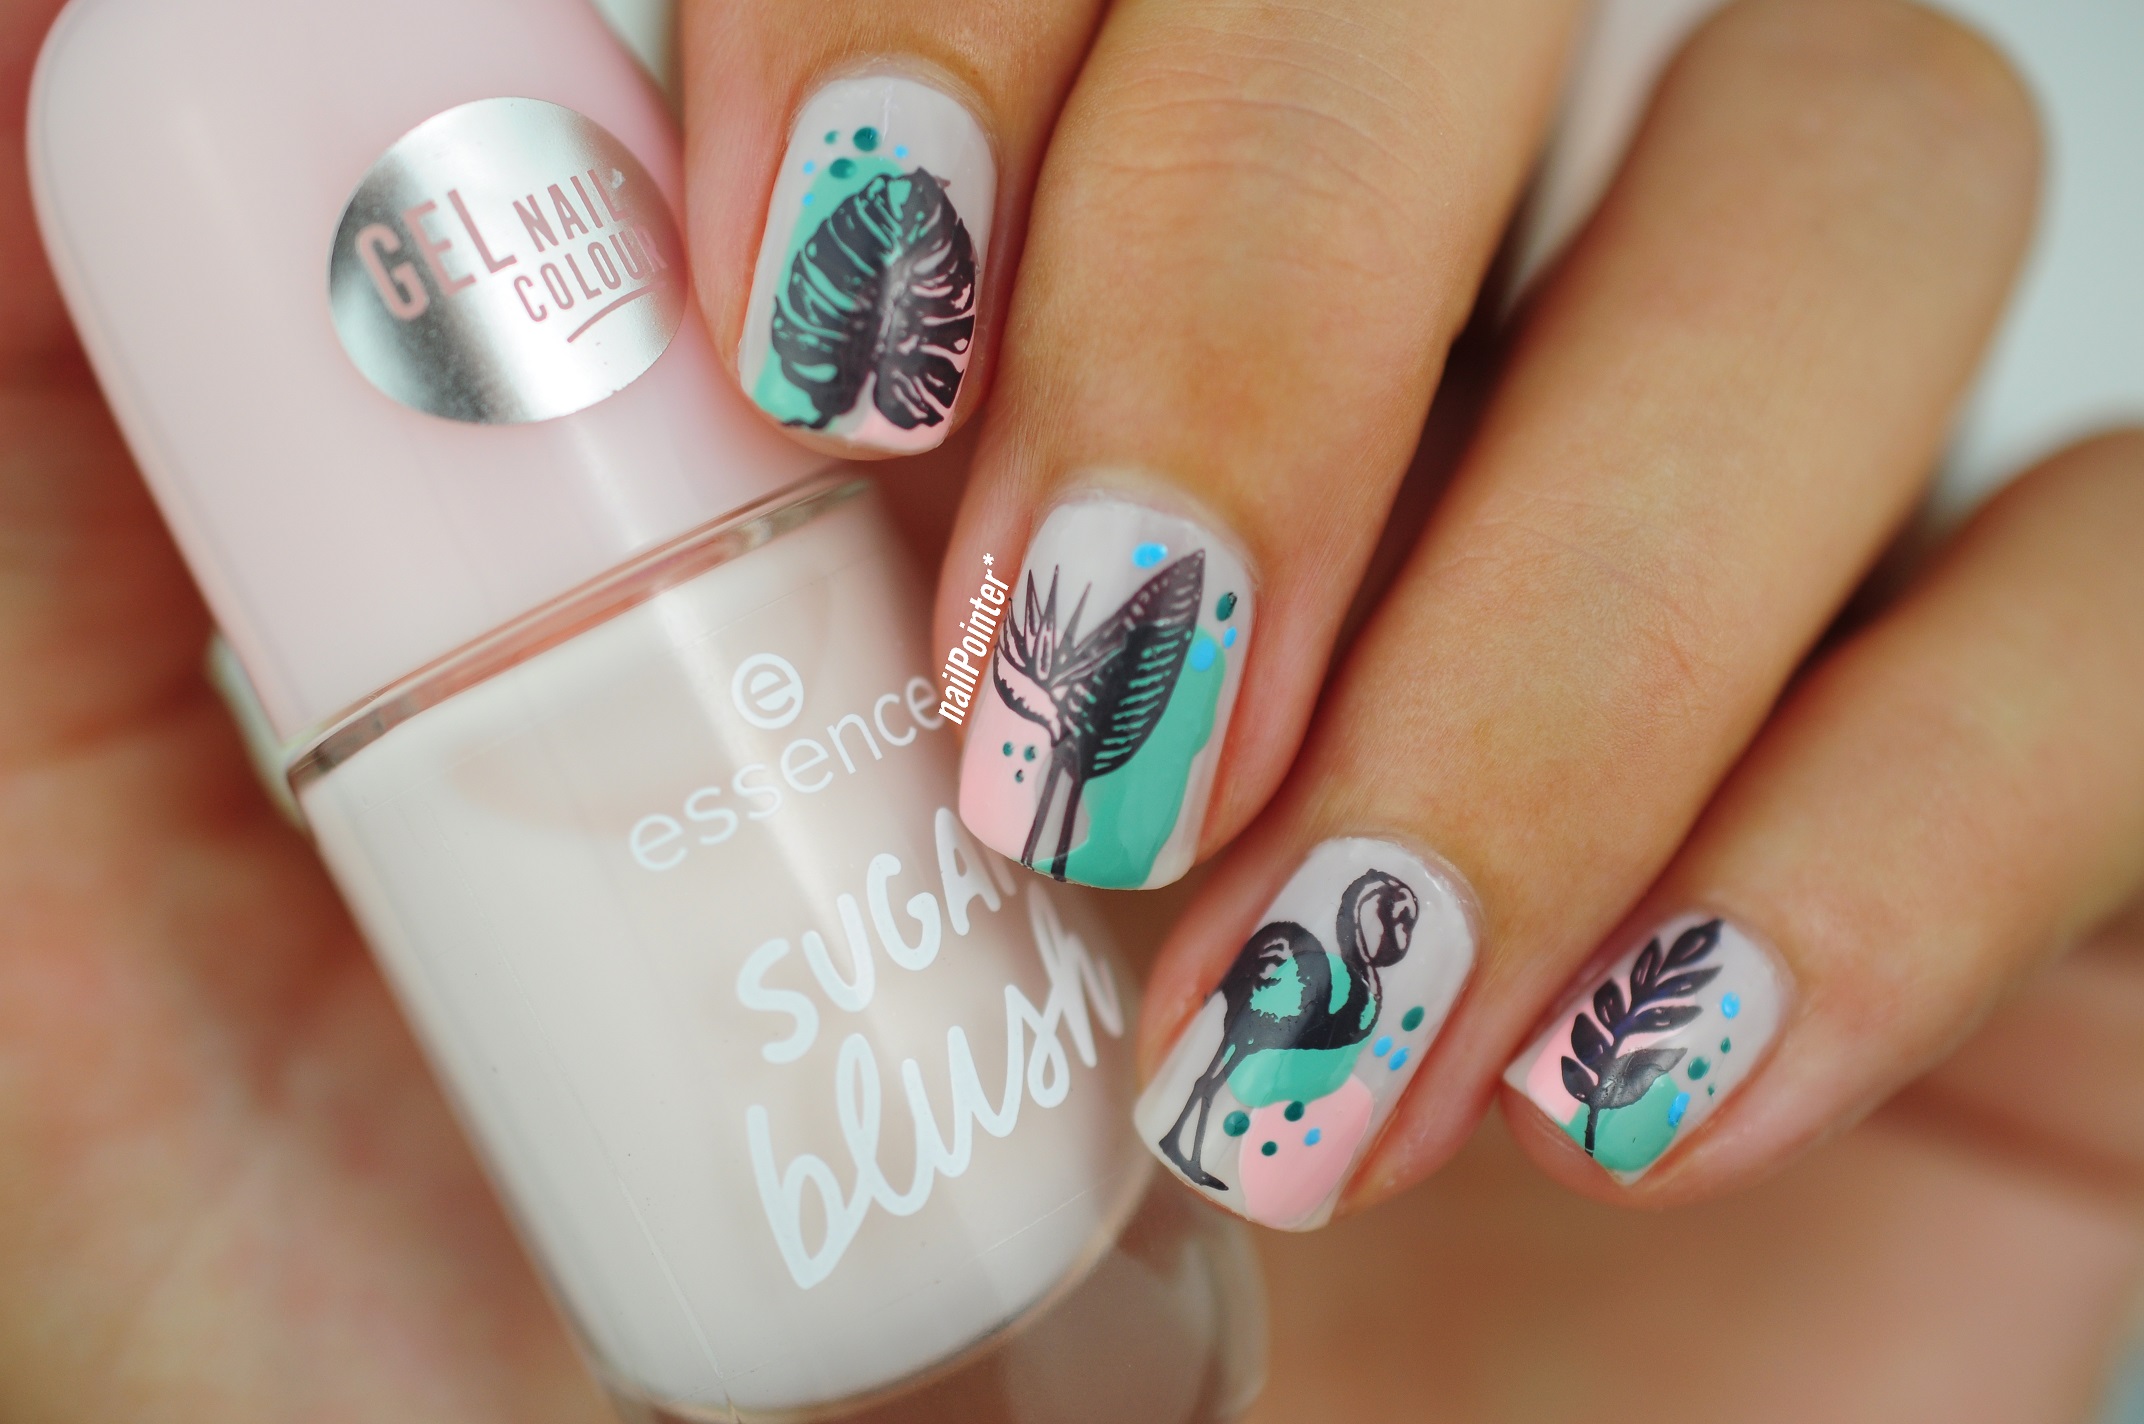
Pastel Paradise // Tropical Summer Nail Look

Pastel Paradise Tropical Summer Nail Look using Essence, Twinkled T and MoYou London Paradise Plates

So I did these nails whilst swatching my latest Essence haul (swatches here) and I knew they'd all go beautifully together to create some wonder tropical looks; including this one!

This was pretty easy but the large brush on Essence polishes make it hard to free-hand circles and shapes cleanly (especially as the formula is a bit gloopy). But it turned out fine in the end.

Pastel Paradise Tropical Summer Nail Look using Essence, Twinkled T and MoYou London Paradise Plates

I started off with 2 layers of Sugar Blush, then placed random splotches of Bubble Trouble followed by Isn't She Minty. The stamps are from Paradise 01 using Ghosted and then I used a dotting tool to place random dots of Don't Leaf Me and Swirl Pool. I topped it off with a layer of Smudge Proof top coat, and then a matte top coat.

I think using a dark grey instead of black made this much better.

Pastel Paradise Tropical Summer Nail Look using Essence, Twinkled T and MoYou London Paradise Plates

Polishes/Tools Used:
- Essence // 05 Sugar Blush (sheer pink), 40 Isn't She Minty (light green), 04 Bubble Trouble (pastel pink)
- Essence // 42 Swirl Pool (blue), 19 Don't Leaf Me (teal green)
- Twinkled T // Smokey (dark grey)
- MoYou London // Paradise 01 Stamping Plate
- MoYou London // Smudge Proof Top Coat
- Barry M // Matte Top Coat
SHARE:

Monday, 11 September 2023

Match That Mani // Strange Bird Cleanser

Match That Mani // Strange Bird Cleanser - nail Art Design of the Strange Bird Cleanser

This look came about when I was in the shower one day and using my favourite cleanser. I've always loved the design on the bottle and have been wanting to do a matching look for a while.

Match That Mani // Strange Bird Cleanser - nail Art Design of the Strange Bird Cleanser

I didn't want an all white base for this look and finally settled on Cuccio - Mystery in Milan however as I started painting I could smell the tell tale sign of formaldehyde. I managed to peel back the little on sticker on the bottom and yep, it's barely even 1 free. The shade isn't even that old. It's a shame as I like the shade and it doesn't have the black specks in it that all new Cuccio shades have but I hate the smell.

Match That Mani // Strange Bird Cleanser - nail Art Design of the Strange Bird Cleanser

Anyway, this was a super quick look to do. Just 2 coats of Mystery in Milan followed by some lines in Cantaloupe first, then some more detailed stamps in Ghosted. I topped it off with a smudge proof top coat. 

I then added a matte top coat as I can never decide between matte or glossy. 

Match That Mani // Strange Bird Cleanser - nail Art Design of the Strange Bird Cleanser

I'm glad I went with an off-white base though as I think the pure white would of slightly ruined the look. This way it also looks like a chic fall look as well.

Match That Mani // Strange Bird Cleanser - nail Art Design of the Strange Bird Cleanser

Polishes & Tools:
Base:
- Cuccio // Mystery In Milan (off white)

Stamping:
- H&M // Cantaloupe (orange)
- Twinkled T // Smokey (dark grey)
- MoYou London // Artist 29 Plate

Top:
- MoYou London // Smudge Proof Top coat
- Barry M // Matte Top Coat

SHARE:

Sunday, 4 December 2022

Christmas Wrapping Nails #1 // Sainsbury's Country Walk Linework Leaves Christmas Bag

Christmas Wrapping Nails #1 // Sainsbury's Country Walk Linework Leaves Christmas Bag

I can't believe it's that time of the year again already. Every year, Sainsbury's do some amazing designs on their wrapping paper and bags that are just begging to be put on nails. Case and point this bag design.
Christmas Wrapping Nails #1 // Sainsbury's Country Walk Linework Leaves Christmas Bag

I went with some designs on the MoYou London Noel 4 plate and Liquid Gold. For the text I used what was left over from stamping the pinkie nail (as it left the perfect oval centre) and then stamped the text in the space.

Christmas Wrapping Nails #1 // Sainsbury's Country Walk Linework Leaves Christmas Bag

Christmas Wrapping Nails #1 // Sainsbury's Country Walk Linework Leaves Christmas Bag

It's not exactly like the bag as the designs aren't as detailed, however I'm waiting for some more Noel plates from the Black Friday sale so hopefully I should be able to get a little closer to the bag.

This is a cute and quick set though!

Christmas Wrapping Nails #1 // Sainsbury's Country Walk Linework Leaves Christmas Bag

Polishes/Tools Used:
Base
- Essence Shine Last & Go // 46 Black is Back
- Barry M // Matte Top Coat

Stamping
- MoYou London Stamping Plate // Noel 04
- Twinkled T Stamping Polish // Liquid Gold
SHARE:

Friday, 2 December 2022

Christmas Peppermint Candy // Red & White Pinwheel Nails

Christmas Peppermint Candy // Red & White Pinwheel Nails

Doesn't this just scream Christmas! I knew the moment I got Chakra that this is the look I should do with it; it's just taken me 4 years to get round to it.

Christmas Peppermint Candy // Red & White Pinwheel Nails

Christmas Peppermint Candy // Red & White Pinwheel Nails

This was a real simple one to do but make sure you where a couple layers of basecoat because Chakra stains!

I did 3 layers of Chakra (it's kind of jelly shade so it builds up beautifully). Applied a layer of top coat. Then applied the stamp with Blanc My Mind and added a layer of smudge proof top coat. Then sealed it in with another layer of top coat.

Christmas Peppermint Candy // Red & White Pinwheel Nails

It's mesmerising!

Christmas Peppermint Candy // Red & White Pinwheel Nails

Polishes/Tools used:
- Cuccio Colour // Chakra (red shimmer)
- What's Up Nails // Blanc My Mind (white)
- Barry M // Wet Set Quick Dry Top Coat
- MoYou London // Smudge Proof Top Coat
- MoYou London Stamping Plate // Princess 12

SHARE:

Tuesday, 7 June 2022

Feeling Summery // FabFitFun Summer 2022 Nails

Feeling Summery // FabFitFun Summer 2022 Nails

Oh my god a new post! So, it's been a while. Was feeling a bit burnt out, then tried to buy a house so packed everything away. It's now been 4 months and no house in sight so I've unpacked all my nail stuff. 

I had to though, look how adorable the FabFitFun box was this season. I knew the moment I saw it, I had to match my nails to it. Can you believe though I only had 2 shades of purple that somewhat matched the FFF box? Looks like I'll have to buy some more polish.

Feeling Summery // FabFitFun Summer 2022 Nails

I started off with 1 layer of Feeling Free. Then picked up the ice lolly stamps off Tumblr Girl 06 with Nether Noir. I then painstakingly painted in each lolly with Violet Haze, Living Your Best Life and Dance Party Teal Dawn. The lollypop stick are Cappuccino and the bite marks Coconut. I then topped it off with a smudge free top coat, then a matte top coat.

Feeling Summery // FabFitFun Summer 2022 Nails

It took about an hour in total but it was worth it. I'm going to have to recreate this look though with pastel colours and a light background as it would look super cute!

Feeling Summery // FabFitFun Summer 2022 Nails

Polishes/Tools Used:-
Base:
- Orly Breathable // Feeling Free (purple)
- MoYou London // Smudge Free Top Coat
- Barry M // Matte Top Coat

Stamping
- What's Up // Nether Noir (black)
- Ciate Plant Pots // Violet Haze (aubergine)
- Barry M Gelly Hi-Shine // Coconut (off-white cream)
- Kure Bazaar // Cappuccino (cream)
- OPI // Dance Party Teal Dawn (teal)
- Nails Inc // Living Your Best Life (yellow)
- MoYou London // Tumblr Girl 06 Stamping Plate

SHARE:

Friday, 1 October 2021

Spooky French Manicure // Candy Corn and Skull Negative Space French Tips Design

Spooky French Manicure // Candy Corn and Skull Negative Space French Mani Design

It's the 1st of October! That means it's time for spooky!! I love Halloween; it's my favourite holiday however I just wish it wasn't so cold. I detest winter.

These nails though could pretty much be warn all year round if you don't look to close. They're inspired by this post I found on Pinterest:

Unfortunately I can't find the original nail artist and a reverse google image search didn't reveal anything either.

It took me quite a while but I'm glad I took my time as I love it! I'm not wearing a peel off basecoat for once so I think I'll wear it for a few days. I also used that new stamper technique to achieve the french tips. What a life hack.

Spooky French Manicure // Candy Corn and Skull Negative Space French Mani Design

How I did it:
Started off with the brightening primer basecoat and then topped that off with 2 layers of Thirsty Nails for that perfect pink/nude base. I applied some Pretty in Putty to an old large stamper and then pushed the tips of my nails into it an angle to achieve the french tip. I did that twice for each nail to build the colour up and then applied a layer of quick dry topcoat.

Next for each nail I pick up the bottom left-most design on the Halloween 03 plate with Nether Noir and removed the already filled hearts and skulls with the tip of a dotting tool. Using a tiny brush I filled in the candy corns with Cantaloupe, The Heat Is On and Pretty in Putty and then filled the skulls in with a large brush and Pretty in Putty. I then left the design to dry on the stamper for a minute or so, applied another layer of quick dry top coat and let it go tacky (about 5 seconds) then stamped on.

Spooky French Manicure // Candy Corn and Skull Negative Space French Mani Design

Spooky French Manicure // Candy Corn and Skull Negative Space French Mani Design

Polishes/Tools Used:-
Base:
- OPI Infinite Shine // Brightening Primer
- Nails Inc // Thirsty Nails (sheer pink)
- Ciaté Gelology // Pretty In Putty (off-white)
- Barry M // Wet Set Quick Dry Top Coat

Stamping:
- Whats Up Nails // Nether Noir (black)
- H&M // The Heat Is On (orange), Cantaloupe (yellow)
- Ciaté Gelology // Pretty In Putty (off-white)
- MoYou London Stamping Plate // Halloween 03
SHARE:

Tuesday, 14 September 2021

Quick Designs // Christmas In September Plaid

Quick Designs // Christmas In September Plaid Nail Art Design using Barry M

Christmas in September anyone? I didn't mean for these to turn out so Christmassy but here we are. In other news, I've started seeing advent calendars and other Christmas related things in the supermarket. Eurgh.

Quick Designs // Christmas In September Plaid Nail Art Design using Barry M


This look was supposed to be "autumnal" but whatever. Also, if you think I'm hiding my thumb because I didn't do it then you are correct 🙈. So this atually started out with a base of Red Sea and then I stamped on the white stripes. The white is too overpowering though; I should've chosen a non-stamping polish. From afar it looks ok though.

Quick Designs // Christmas In September Plaid Nail Art Design using Barry M

Polishes/Tools used:
- Barry M Green Origin // Red Sea (red), Night Sky (blue), Evergreen (green)
- Barry M Liquid Chrome // Bright Lights (gold)
- Twinkled T // Glow Up (white)

SHARE:

Monday, 26 July 2021

NailNerdChallenge July 2021 // Nautical Nails

Blue Teal Mermaid Nails NailNerdChallenge July 2021 // Nautical Nails

Mermaids are considered to fall under the "nautical" category right?? Well they do now because I love this look I did. 

Blue Teal Mermaid Nails NailNerdChallenge July 2021 // Nautical Nails

Blue Teal Mermaid Nails NailNerdChallenge July 2021 // Nautical Nails

It came about whilst I swatching some China Glaze shades and I couldn't help but stick a load of glittery toppers on Too Yacht to Handle. Negative stamps are also the best because I can only imagine a stamping polish like that would cost a fortune.

Blue Teal Mermaid Nails NailNerdChallenge July 2021 // Nautical Nails

For these nails I started out with 2 coats of Too Yacht To Handle followed by a layer of Diamond Glitter, then Will-'O-The-Wisp and dry brushed on alternate strokes of Crystal Blue and Pink Luxe. I then used born pretty stamping plate on my middle finger and Moyou on the rest. 

Polishes/Tools Used:
Nails:
- China Glaze // Too Yacht To Handle (teal)
- Barry M Nail Paint // Diamond Glitter (scattered holo)
- H&M // Will-'O-The-Wisp (green duochrome shimmer topper)
- Barry M Molten Metal // Crystal Blue, Pink Luxe

Stamping:
- What's Up Nails // Blanc My Mind (white)
- Born Pretty Stamping Plate // BP-109 (middle finger)
- MoYou London Stamping Plate // Sailor 04 (rest of fingers)

SHARE:

Wednesday, 21 July 2021

NailNerdChallenge July 2021 // Tropical Nails

Dark Blue Tropical Hibiscus Nails NailNerdChallenge July 2021 // Tropical Nails

So this was the first prompt but I forgot to post it, so here it is! Usually when I do tropical I go for a pink or peach background with green leaves so I decided to mix it up with some darker colours and bright pops! 

Dark Blue Tropical Hibiscus Nails NailNerdChallenge July 2021 // Tropical Nails

Dark Blue Tropical Hibiscus Nails NailNerdChallenge July 2021 // Tropical Nails

For this one I started out with a layer of Night Sky, then applied Deep Ocean, Dream Holiday and Turquoise Mint to a design on the Paradise 02 plate. Scraping the polish blends them all together and then I stamped that on top. Afterwards I used the flower designs from Paradise 05 first in white so the colours would pop more then used No Tan Lines, My Showcase Pink and Raspberry fro the flower details. The little yellow pollen stems had a white base stamp and then Maui Gold stamped on top.

Polishes/Tools Used:
Nails:
- Barry M Green Origin // Night Sky (dark blue)

Stamping:
- MoYou London // Dream Holiday (blue), Deep Ocean (deep blue), Turquoise Mint (mint)
- Maniology // Maui Gold (yellow)
- OPI Infinite Shine // No Tan Lines (orange)
- Barry M Nail Paint // 273 Raspberry
- Kure Bazaar // My Showcase Pink (fuschia)
- What's Up Nails // Blanc My Mind (white)
- MoYou London Stamping Plates // Paradise 02, Paradise 05


SHARE:
Blog Design Created by pipdig