A Nail Art/Nail polish blog by a really nerdy software Engineer

Wednesday, 24 December 2025

[Look] Frosted White & Gold Christmas Nails

Frosted White & Gold Christmas Nails Design

Frosted White & Gold Christmas Nails Design

Another look I did christmas 2023. I've become a real fan of translucent matte nails with layered stamps on them. I think it just reminds me of nice wrapping paper and it's super fast to do.

Frosted White & Gold Christmas Nails Design

Method:
I started off with two coats of Ice Cold Milk, then used a large pattern from Noel 07 in 660 L'or. I then used some singular flower designs from the same plate in Glow Up and followed it up with a smudge proof top coat and a matte top coat.

Frosted White & Gold Christmas Nails Design

Polishes/Tools Used:
Base:
- H&M // Ice Cold Milk (off white)

Stamping:
- Twinkled T // Glow Up (white)
- L'Oreal Color Riche // 660 L'or (gold)

Plates:
- MoYou London // Noel 07

Top:
- MoYou London // Smudge Proof Top Coat
- Barry M // Matte Top Coat
SHARE:

Monday, 22 December 2025

[Look] Teal Christmas Woodland Scene

Teal Christmas Woodland Scene Nail Design

Teal Christmas Woodland Scene Nail Design

I did these a while ago now (the picture metadata says 13th November 2023....) but seeing as it's christmas once again, I guess I can finally post them.

I painted these onto some false nails I picked up from Primark a while ago. I kind of like the shape but I chose sizes that were way to big for me. Either way, it's always nice to be able to paint on your own time and not worry about catching your nails on something.

Teal Christmas Woodland Scene Nail Design

Method:
I started off with two layers of I'm on a Sushi Roll. Then stamped on some flower designs from Noel 07 using Café au Lait, followed by Rusty Red and Ghosted on top. For the deer, I used a design from Fall in Love 01 and picked that up with Ghosted, then filled it in on the stamper with Cappuccino. The flower is from Noel 07 and I picked that up with Ghosted as well but filled it in with Café au Lait. The "snow" I did by hand just using a dotting tool with Ice Cold Milk (a sheer off white shade). I topped all that off with a smudge proof top coat and then a matte top coat.

Teal Christmas Woodland Scene Nail Design

Polishes/Tools Used:
Base:
- OPI Infinite Shine // I'm on a Sushi Roll (teal)

Stamping:
- H&M // Ice Cold Milk (off white)
- MoYou London // Café au Lait (light oat), Rusty Red (burgandy)
- Kure Bazaar // Cappuccino (beige)
- Twinkled T // Ghosted (dark grey)

Plates:
- MoYou London // Noel 07, Fall in Love 01

Top:
- MoYou London // Smudge Proof Top Coat
- Barry M // Matte Top Coat
SHARE:

Friday, 8 December 2023

Christmas Wrapping Paper Nails #2 // Mint Festive Design

Christmas Wrapping Paper Nails #2 // Mint Festive Design

Christmas Wrapping Paper Nails #2 // Mint Festive Design

This is mint version of a design I saw in Sainsbury's last year. I did a dark version of it here: https://ifndefnailsh.blogspot.com/2022/12/christmas-wrapping-nails-1-sainsburys.html

I think I prefer this one thanks to the over-stamping!

Christmas Wrapping Paper Nails #2 // Mint Festive Design

Christmas Wrapping Paper Nails #2 // Mint Festive Design

Method:
I started off with 2 layers of Neely. Then I applied Liquid Gold to Noel 07 and then stamped on top with Vibin using the same stamps but slightly offset. The Holly jolly text comes from Noel 12.

I then topped it off with some smudge proof top coat.

Christmas Wrapping Paper Nails #2 // Mint Festive Design

Polishes/Tools Used:
Base:
- Zoya // Neely (mint)

Stamping:
- Twinkled T // Liquid Gold (metallic gold), 'Vibin (black)

Plates:
- MoYou London // Noel 07, Noel 12

Top:
- MoYou London // Smudge Proof Top Coat
SHARE:

Friday, 3 November 2023

New Flower Wave // Pastel Art Synth Wave Design

New Flower Wave // Pastel Art Synth Wave Design

I did this one earlier this year but I've only just got round to posting it now. If you couldn't tell, I think my obsession this year was line art and over-stamping.

New Flower Wave // Pastel Art Synth Wave Design

New Flower Wave // Pastel Art Synth Wave Design

I'm all for these simple looks that look like they belong in a museum or something. This one was quite simple to do. I started off with 1 layer of Mystery In Milan. Then, on a silicone mat I placed a large blob of Mystery In Milan and dotted Soho Square and Waterloo Place into it. I "smooshed" it together on the mat with a stamper and then applied it to the nail. I used stamping designs from Artist 29 in Blanc My Mind followed by the same stamps but offset slightly in Black Knight. I topped it all off with some smudge proof top coat.

New Flower Wave // Pastel Art Synth Wave Design

New Flower Wave // Pastel Art Synth Wave Design

New Flower Wave // Pastel Art Synth Wave Design

Polishes/Tools Used:
Base:
Cuccio Colour // Mystery In Milan (off-white)
Nails Inc // Soho Square (peach/pink), Waterloo Place (bubblegum pink)

Stamping:
What's Up Beauty // Blanc My Mind (white)
MoYou London // Black Knight (black), Artist 29 Plate

Top:
MoYou London // Smudge Proof Top Coat
SHARE:

Thursday, 2 November 2023

Minty Jungle // Pastel Green Leaf Design

Minty Jungle // Pastel Green Leaf Design

I have wrapping paper that I bought from John Lewis a very long time ago that inspired this look. You could say it's a Christmas Wrapping paper look as I'll probably be using to wrap presents this year.

Minty Jungle // Pastel Green Leaf Design

I'm not happy with how hard it is to see the leaf design (even though the background colour is so light). I'll go in with darker colours next time.

Minty Jungle // Pastel Green Leaf Design

I started off with 2 layers of 'Til The Record Stops, then used a large stamp from Paradise 02. I put both Cobalt Indecent and I'm On A Sushi Roll onto the plate and mixed them together to create the stamp. I then over-stamped in some placed using Lor for that "gold foil" look.

Minty Jungle // Pastel Green Leaf Design

Minty Jungle // Pastel Green Leaf Design

Polishes/Tools Used:
Base:
- Color Club // 'Til The Record Stops (mint green)

Stamping:
- L'Oreal Paris // Cobalt Indecent (dark teal), Lor (gold)
- OPI Infinite Shine // I'm On A Sushi Roll (light teal)
- MoYou London // Paradise 02 Stamping Plate

Top:
MoYou London // Smudge Proof Top Coat


SHARE:

Monday, 30 October 2023

Holoween Boo // Negative Space Halloween Ghost Holo Design

Holoween Boo Negative Space Halloween Ghost Holo Design

I wanted something simple yet spooky and ended up stamping on these negative space designs while painting my nails one morning.

This is a super simple one; just 3 layers of Dare to Bare followed by the negative stamp designs using Mrs Danvers.

Holoween Boo Negative Space Halloween Ghost Holo Design

Polishes/Tools Used:
Base:
- Nails Inc // Dare To Bare (sheer pink)

Stamping:
- A-England // Mrs Danvers (black holo)
- MoYou London // Halloween 03 Stamping Plate

Top:
- MoYou London // Smudge Proof Top Coat
SHARE:

Thursday, 26 October 2023

It's In The Cards // Tarot Halloween Nails

It's In The Cards Tarot Halloween Nails using China Glaze Maniology

This was a fiddly design and I need waay more practice with layering stamps that are straight lines. This didn't turn out exactly how I wanted but it's close enough and I think it looks ok.

It's In The Cards Tarot Halloween Nails using China Glaze Maniology

I feel like the tarot cards themselves need more colour on them. I started off with 2 layers of Cowboy Bye, then stamped in this order:
  1. Card background using Cafe au Lait
  2. Tarot design using Smokey
  3. Card borders using Bright Lights
Then added a layer of smudge proof top coat followed by a matte top coat.

It's In The Cards Tarot Halloween Nails using China Glaze Maniology

It's In The Cards Tarot Halloween Nails using China Glaze Maniology

Polishes/Tools Used:
Base:
- China Glaze // Cowboy, Bye (dark brown holographic)

Stamping:
- MoYou London // Cafe au Lait (light beige)
- Twinkled T // Smokey (dark grey)
- Barry M Liquid Chrome // Bright Lights (gold)
- Maniology // M072 Stamping Plate

Top:
- MoYou London Smudge Proof Top Coat
- Barry M // Matte Top Coat
SHARE:

Friday, 13 October 2023

Neon Halloween // Neon Orange & Black Pumpkin Carving Design

Neon Halloween // Neon Orange & Black Pumpkin Look

A super quick halloween look! Not spooky in the slightest but perfect for nights out when you have about 20 minutes to do your nails.

This involved 2 coats of Paradise City followed by the designs stamped with Neither Noir with a matte top coat on top. And that's it!

Neon Halloween // Neon Orange & Black Pumpkin Look

Neon Halloween // Neon Orange & Black Pumpkin Look

Polishes/Tools Used:
Base:
- Cuccio Colour // Paradise City (orange)

Stamping:
- What's Up Nails // Neither Noir (black)

Top:
- MoYou London // Smudge Proof Top Coat
- Barry M // Matte Top Coat


SHARE:

Wednesday, 11 October 2023

Honey Flowers // Beige Autumnal Flower Design

Honey Flowers // Beige Autumnal Flower Design

Another look that came about whilst swatching the Nails Inc Nail Spice collection! This was a super quick one. Just 2 layers of Honey Lane, followed by designs stamped on with Smokey and Bright Lights, then a layer of smudge proof top coat and matte top coat.

Honey Flowers // Beige Autumnal Flower Design

Polishes/Tools Used:
Base:
- Nails Inc // Honey Lane (pink beige)

Stamping:
- Twinkled T // Smokey (dark grey)
- Barry M Liquid Chrome // Bright Lights (gold)
- MoYou London // Botanical 16 Stamping Plate

Top:
- MoYou London // Smudge Proof Top Coat
- Barry M // Matte Top Coat


SHARE:

Friday, 6 October 2023

Cosy Plaid // Beige Autumn Plaid Look

Cosy Plaid // Beige Autumn Plaid Look

This came about whilst I was swatching the Nails Inc Nails Spice Set. It doesn't get much more autumnal pumpkin spice vibes than these 4 shades and I thought they'd be perfect for a scarf look.

These stamp better than I thought they would!

Polishes/Tools Used:
Base:
- Nails Inc // Pudding Lane (off white)

Stamping:
- Nails Inc // Bread Street (pale mauve), Honey Lane (beige), Nutmeg Lane (terracotta)
- MoYou London // Trend Hunter 27 Stamping Plate

Top:
- MoYou London // Smudge Free Top Coat

SHARE:

Wednesday, 4 October 2023

Autumn Lane // Nude Beige Autumn Nails

Autumn Lane - Nude Beige Autumn Nails Design using Nails Inc Nail Spice Collection and MoYou London

This came about whilst I was swatching the Nails Inc Nail Spice collection. I wanted to see how well the darkest shade could stamp and I think it turned out quite well.

Autumn Lane - Nude Beige Autumn Nails Design using Nails Inc Nail Spice Collection and MoYou London

I started off with 2 coats of Honey Lane, then dry brushed on some Pudding Lane and Bread Street for contrast. I used Nutmeg Lane for the base stamps and then used the L'or to bring some shine in via the gold before sticking a matte top coat on top.

Autumn Lane - Nude Beige Autumn Nails Design using Nails Inc Nail Spice Collection and MoYou London

This was a pretty quick look and quite effective! It feels like witchy vibes but make it pumpkin spice.

Polishes/Tools Used:
Base:
- Nails Inc // 
Honey Lane (dusty peach), 
Pudding Lane (pale pink), 
Bread Street (dusty pink),

Stamping:
- Nails Inc // Nutmeg Lane (terracotta)
- L'Oreal Color Riche // 660 L'or (gold shimmer)
- MoYou London // Fall in Love 15 Stamping Plate

Top:
- MoYou London // Smudge Free Top Coat
- Barry M // Matte Top Coat
SHARE:

Wednesday, 27 September 2023

Tropical Terracotta // Tropical Leaves with Nude Background

Tropical Terracotta // Tropical Leaves with Nude Background

This look was inspired by a painted plant pot I saw on pinterest! I was swatching some new Barry M shades I got and I thought Honeysuckle would make the perfect background for the dark blue and white and I was right! It's just neutral and soft enough to provide the perfect contrast.

Tropical Terracotta // Tropical Leaves with Nude Background


I started off with Honeysuckle as the base then stamped on the designs from one my favourite paradise plates. Followed by some gold dots and topped off with a matte top coat.

Tropical Terracotta // Tropical Leaves with Nude Background

Tropical Terracotta // Tropical Leaves with Nude Background

Polishes/Tools Used:
Base:
- Barry M Gelly Hi-Shine // Honeysuckle (terracotta)

Stamping:
- MoYou London // Midnight Madness (dark blue)
- Twinkled T // Glow Up (white)
- L'Oreal Color Riche // L'Or (gold)
- MoYou London // Paradise 01 Stamping Plate

Top:
- Barry M // Matte Top Coat
 
SHARE:

Tuesday, 26 September 2023

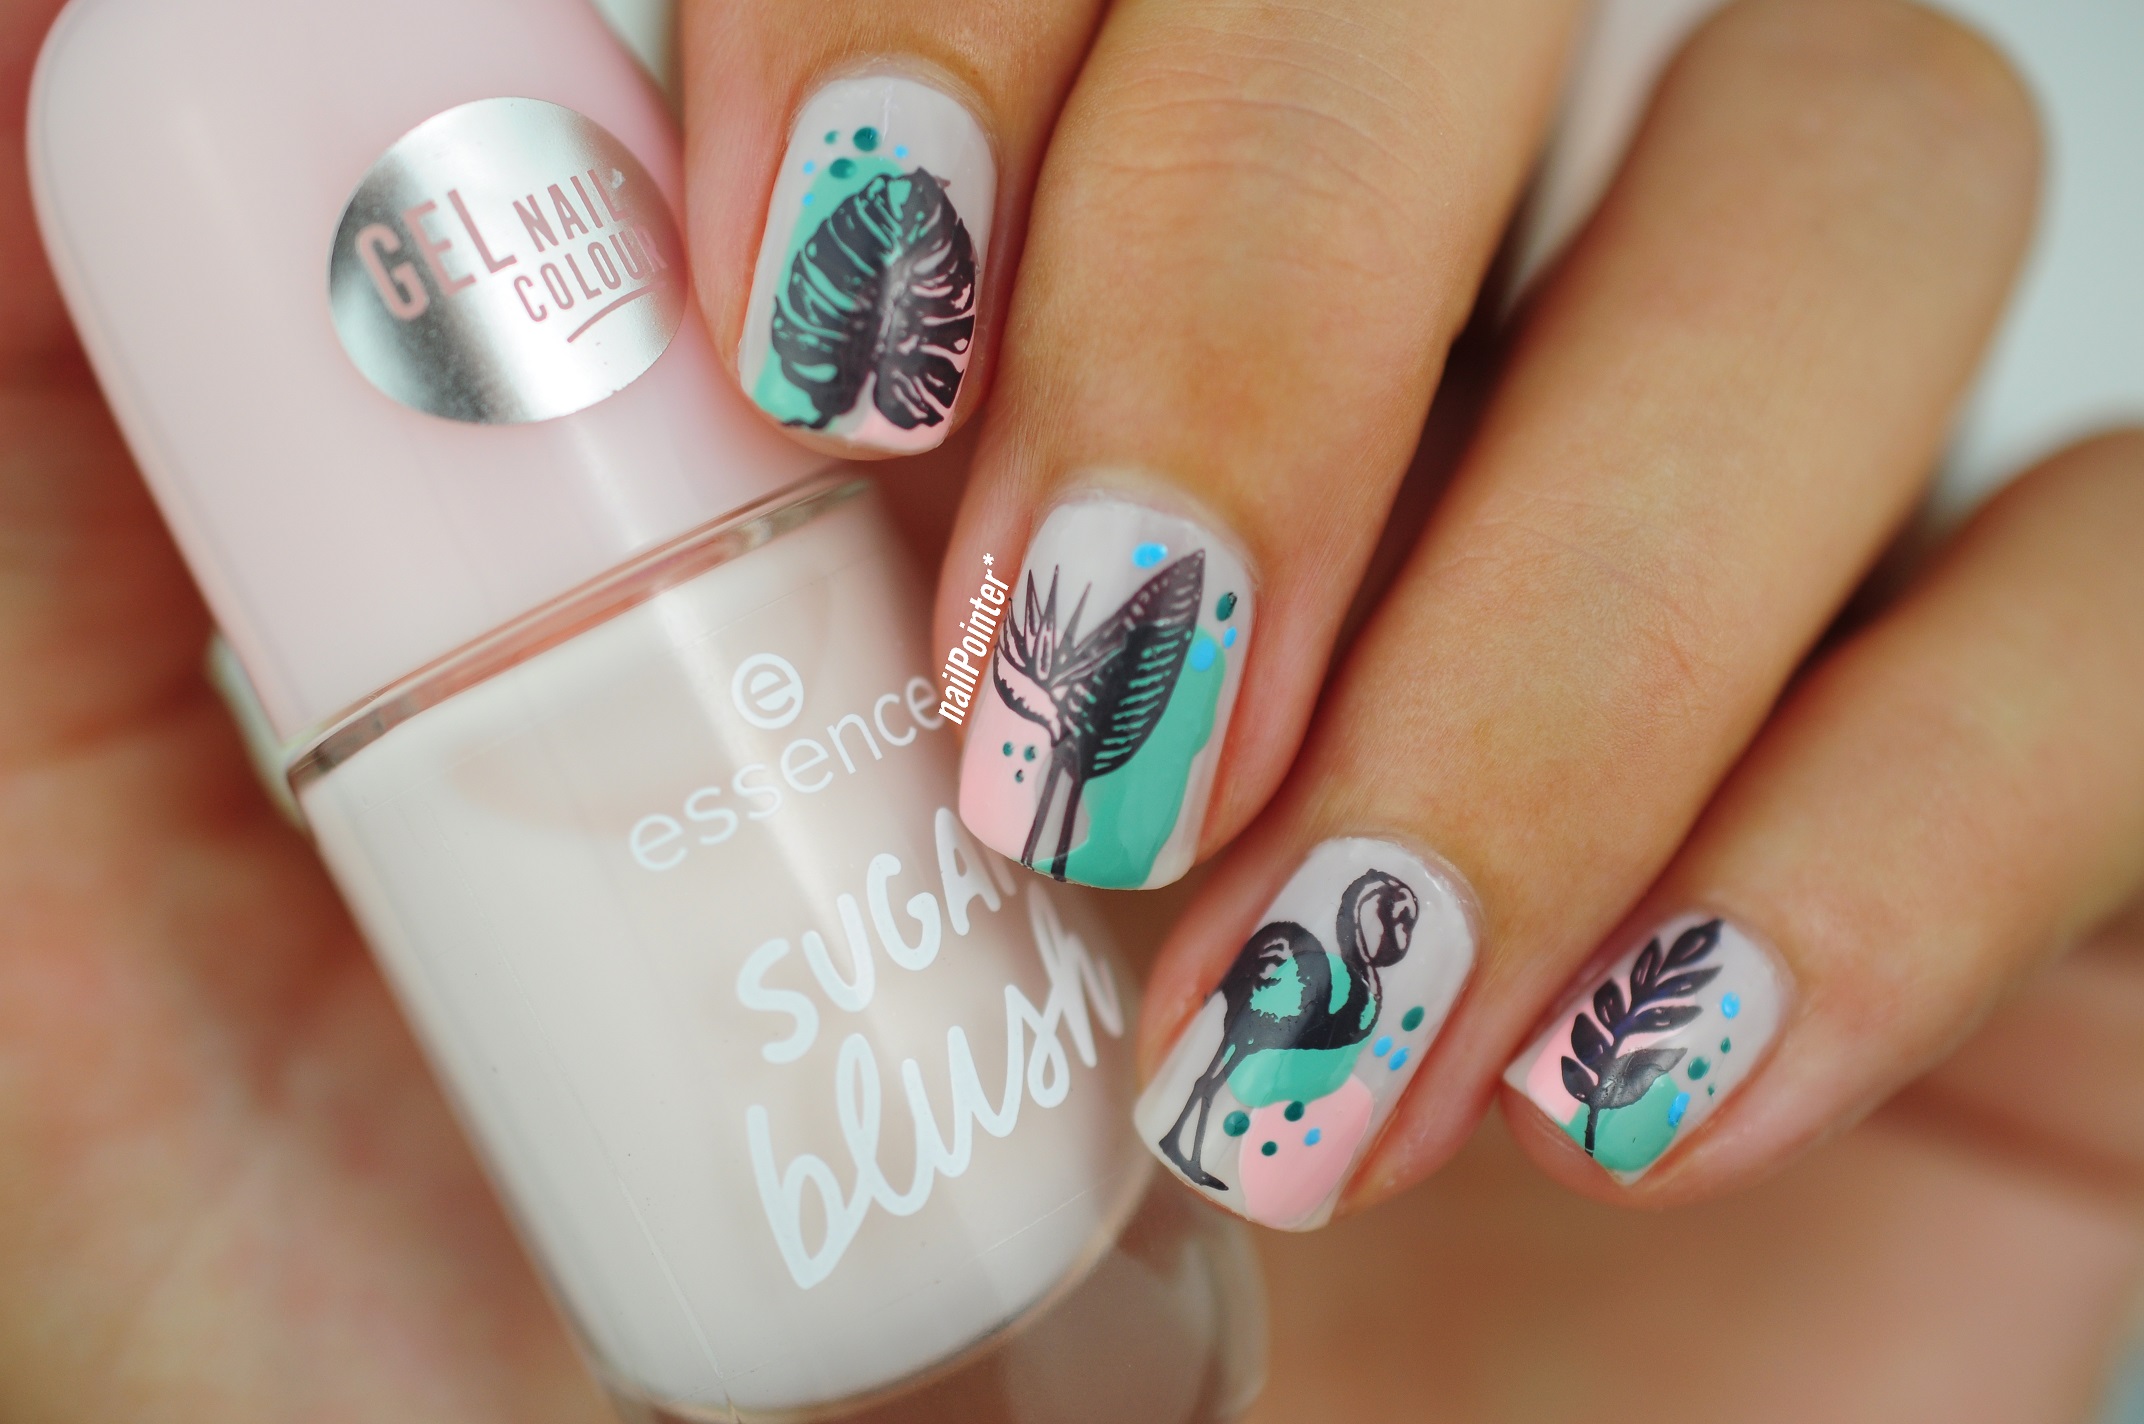
Pastel Paradise // Tropical Summer Nail Look

Pastel Paradise Tropical Summer Nail Look using Essence, Twinkled T and MoYou London Paradise Plates

So I did these nails whilst swatching my latest Essence haul (swatches here) and I knew they'd all go beautifully together to create some wonder tropical looks; including this one!

This was pretty easy but the large brush on Essence polishes make it hard to free-hand circles and shapes cleanly (especially as the formula is a bit gloopy). But it turned out fine in the end.

Pastel Paradise Tropical Summer Nail Look using Essence, Twinkled T and MoYou London Paradise Plates

I started off with 2 layers of Sugar Blush, then placed random splotches of Bubble Trouble followed by Isn't She Minty. The stamps are from Paradise 01 using Ghosted and then I used a dotting tool to place random dots of Don't Leaf Me and Swirl Pool. I topped it off with a layer of Smudge Proof top coat, and then a matte top coat.

I think using a dark grey instead of black made this much better.

Pastel Paradise Tropical Summer Nail Look using Essence, Twinkled T and MoYou London Paradise Plates

Polishes/Tools Used:
- Essence // 05 Sugar Blush (sheer pink), 40 Isn't She Minty (light green), 04 Bubble Trouble (pastel pink)
- Essence // 42 Swirl Pool (blue), 19 Don't Leaf Me (teal green)
- Twinkled T // Smokey (dark grey)
- MoYou London // Paradise 01 Stamping Plate
- MoYou London // Smudge Proof Top Coat
- Barry M // Matte Top Coat
SHARE:

Monday, 11 September 2023

Match That Mani // Strange Bird Cleanser

Match That Mani // Strange Bird Cleanser - nail Art Design of the Strange Bird Cleanser

This look came about when I was in the shower one day and using my favourite cleanser. I've always loved the design on the bottle and have been wanting to do a matching look for a while.

Match That Mani // Strange Bird Cleanser - nail Art Design of the Strange Bird Cleanser

I didn't want an all white base for this look and finally settled on Cuccio - Mystery in Milan however as I started painting I could smell the tell tale sign of formaldehyde. I managed to peel back the little on sticker on the bottom and yep, it's barely even 1 free. The shade isn't even that old. It's a shame as I like the shade and it doesn't have the black specks in it that all new Cuccio shades have but I hate the smell.

Match That Mani // Strange Bird Cleanser - nail Art Design of the Strange Bird Cleanser

Anyway, this was a super quick look to do. Just 2 coats of Mystery in Milan followed by some lines in Cantaloupe first, then some more detailed stamps in Ghosted. I topped it off with a smudge proof top coat. 

I then added a matte top coat as I can never decide between matte or glossy. 

Match That Mani // Strange Bird Cleanser - nail Art Design of the Strange Bird Cleanser

I'm glad I went with an off-white base though as I think the pure white would of slightly ruined the look. This way it also looks like a chic fall look as well.

Match That Mani // Strange Bird Cleanser - nail Art Design of the Strange Bird Cleanser

Polishes & Tools:
Base:
- Cuccio // Mystery In Milan (off white)

Stamping:
- H&M // Cantaloupe (orange)
- Twinkled T // Smokey (dark grey)
- MoYou London // Artist 29 Plate

Top:
- MoYou London // Smudge Proof Top coat
- Barry M // Matte Top Coat

SHARE:
Blog Design Created by pipdig