A Nail Art/Nail polish blog by a really nerdy software Engineer

Friday, 3 November 2023

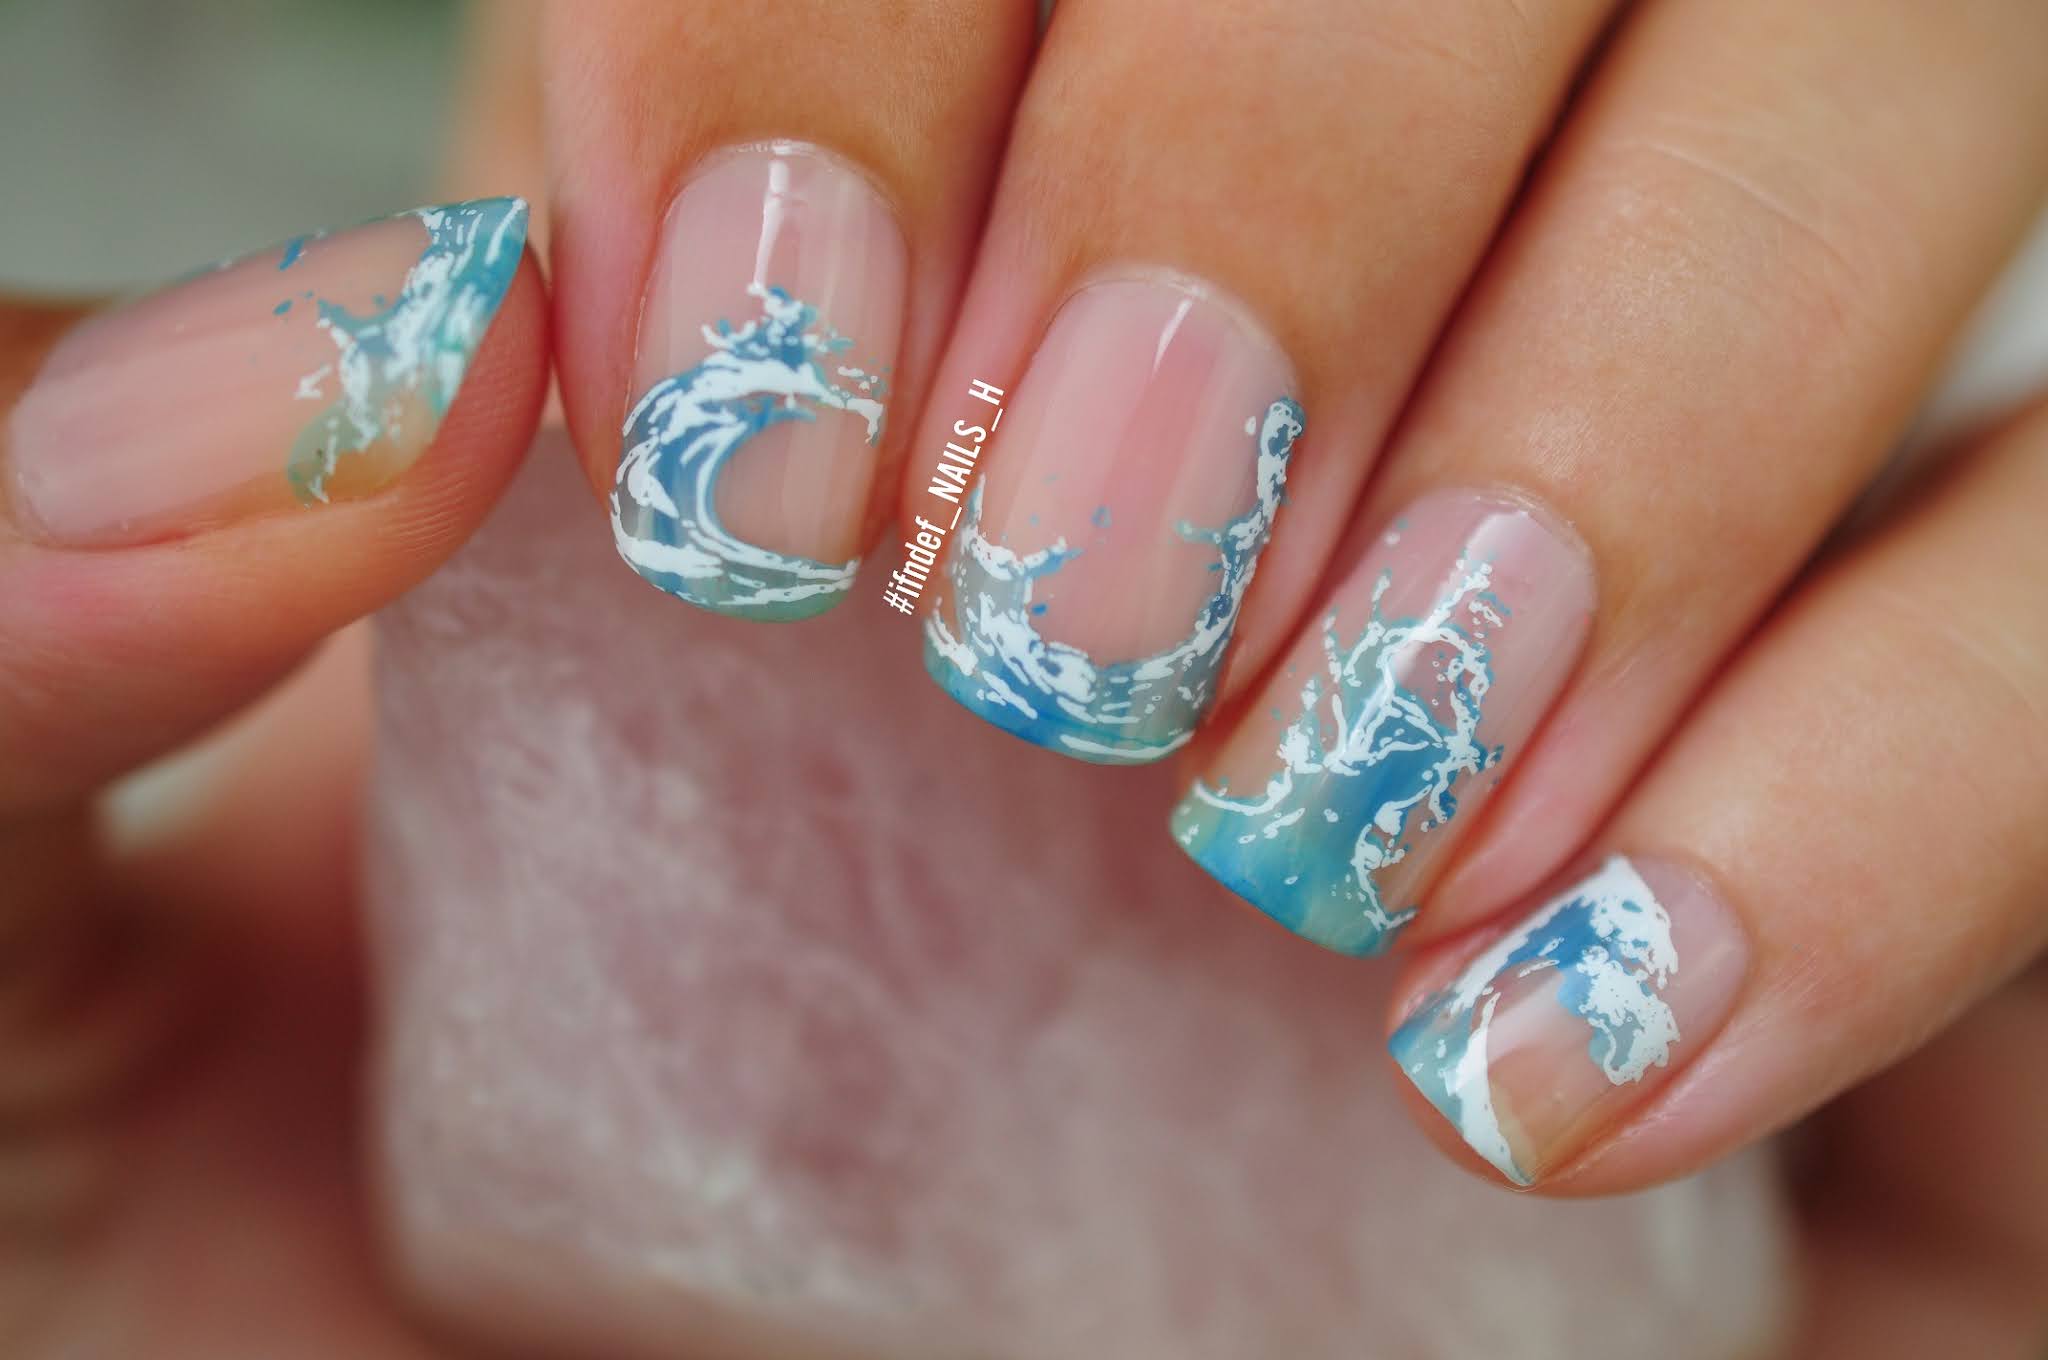
New Flower Wave // Pastel Art Synth Wave Design

New Flower Wave // Pastel Art Synth Wave Design

I did this one earlier this year but I've only just got round to posting it now. If you couldn't tell, I think my obsession this year was line art and over-stamping.

New Flower Wave // Pastel Art Synth Wave Design

New Flower Wave // Pastel Art Synth Wave Design

I'm all for these simple looks that look like they belong in a museum or something. This one was quite simple to do. I started off with 1 layer of Mystery In Milan. Then, on a silicone mat I placed a large blob of Mystery In Milan and dotted Soho Square and Waterloo Place into it. I "smooshed" it together on the mat with a stamper and then applied it to the nail. I used stamping designs from Artist 29 in Blanc My Mind followed by the same stamps but offset slightly in Black Knight. I topped it all off with some smudge proof top coat.

New Flower Wave // Pastel Art Synth Wave Design

New Flower Wave // Pastel Art Synth Wave Design

New Flower Wave // Pastel Art Synth Wave Design

Polishes/Tools Used:
Base:
Cuccio Colour // Mystery In Milan (off-white)
Nails Inc // Soho Square (peach/pink), Waterloo Place (bubblegum pink)

Stamping:
What's Up Beauty // Blanc My Mind (white)
MoYou London // Black Knight (black), Artist 29 Plate

Top:
MoYou London // Smudge Proof Top Coat
SHARE:

Friday, 13 October 2023

Neon Halloween // Neon Orange & Black Pumpkin Carving Design

Neon Halloween // Neon Orange & Black Pumpkin Look

A super quick halloween look! Not spooky in the slightest but perfect for nights out when you have about 20 minutes to do your nails.

This involved 2 coats of Paradise City followed by the designs stamped with Neither Noir with a matte top coat on top. And that's it!

Neon Halloween // Neon Orange & Black Pumpkin Look

Neon Halloween // Neon Orange & Black Pumpkin Look

Polishes/Tools Used:
Base:
- Cuccio Colour // Paradise City (orange)

Stamping:
- What's Up Nails // Neither Noir (black)

Top:
- MoYou London // Smudge Proof Top Coat
- Barry M // Matte Top Coat


SHARE:

Friday, 2 December 2022

Christmas Peppermint Candy // Red & White Pinwheel Nails

Christmas Peppermint Candy // Red & White Pinwheel Nails

Doesn't this just scream Christmas! I knew the moment I got Chakra that this is the look I should do with it; it's just taken me 4 years to get round to it.

Christmas Peppermint Candy // Red & White Pinwheel Nails

Christmas Peppermint Candy // Red & White Pinwheel Nails

This was a real simple one to do but make sure you where a couple layers of basecoat because Chakra stains!

I did 3 layers of Chakra (it's kind of jelly shade so it builds up beautifully). Applied a layer of top coat. Then applied the stamp with Blanc My Mind and added a layer of smudge proof top coat. Then sealed it in with another layer of top coat.

Christmas Peppermint Candy // Red & White Pinwheel Nails

It's mesmerising!

Christmas Peppermint Candy // Red & White Pinwheel Nails

Polishes/Tools used:
- Cuccio Colour // Chakra (red shimmer)
- What's Up Nails // Blanc My Mind (white)
- Barry M // Wet Set Quick Dry Top Coat
- MoYou London // Smudge Proof Top Coat
- MoYou London Stamping Plate // Princess 12

SHARE:

Tuesday, 7 June 2022

Feeling Summery // FabFitFun Summer 2022 Nails

Feeling Summery // FabFitFun Summer 2022 Nails

Oh my god a new post! So, it's been a while. Was feeling a bit burnt out, then tried to buy a house so packed everything away. It's now been 4 months and no house in sight so I've unpacked all my nail stuff. 

I had to though, look how adorable the FabFitFun box was this season. I knew the moment I saw it, I had to match my nails to it. Can you believe though I only had 2 shades of purple that somewhat matched the FFF box? Looks like I'll have to buy some more polish.

Feeling Summery // FabFitFun Summer 2022 Nails

I started off with 1 layer of Feeling Free. Then picked up the ice lolly stamps off Tumblr Girl 06 with Nether Noir. I then painstakingly painted in each lolly with Violet Haze, Living Your Best Life and Dance Party Teal Dawn. The lollypop stick are Cappuccino and the bite marks Coconut. I then topped it off with a smudge free top coat, then a matte top coat.

Feeling Summery // FabFitFun Summer 2022 Nails

It took about an hour in total but it was worth it. I'm going to have to recreate this look though with pastel colours and a light background as it would look super cute!

Feeling Summery // FabFitFun Summer 2022 Nails

Polishes/Tools Used:-
Base:
- Orly Breathable // Feeling Free (purple)
- MoYou London // Smudge Free Top Coat
- Barry M // Matte Top Coat

Stamping
- What's Up // Nether Noir (black)
- Ciate Plant Pots // Violet Haze (aubergine)
- Barry M Gelly Hi-Shine // Coconut (off-white cream)
- Kure Bazaar // Cappuccino (cream)
- OPI // Dance Party Teal Dawn (teal)
- Nails Inc // Living Your Best Life (yellow)
- MoYou London // Tumblr Girl 06 Stamping Plate

SHARE:

Friday, 1 October 2021

Spooky French Manicure // Candy Corn and Skull Negative Space French Tips Design

Spooky French Manicure // Candy Corn and Skull Negative Space French Mani Design

It's the 1st of October! That means it's time for spooky!! I love Halloween; it's my favourite holiday however I just wish it wasn't so cold. I detest winter.

These nails though could pretty much be warn all year round if you don't look to close. They're inspired by this post I found on Pinterest:

Unfortunately I can't find the original nail artist and a reverse google image search didn't reveal anything either.

It took me quite a while but I'm glad I took my time as I love it! I'm not wearing a peel off basecoat for once so I think I'll wear it for a few days. I also used that new stamper technique to achieve the french tips. What a life hack.

Spooky French Manicure // Candy Corn and Skull Negative Space French Mani Design

How I did it:
Started off with the brightening primer basecoat and then topped that off with 2 layers of Thirsty Nails for that perfect pink/nude base. I applied some Pretty in Putty to an old large stamper and then pushed the tips of my nails into it an angle to achieve the french tip. I did that twice for each nail to build the colour up and then applied a layer of quick dry topcoat.

Next for each nail I pick up the bottom left-most design on the Halloween 03 plate with Nether Noir and removed the already filled hearts and skulls with the tip of a dotting tool. Using a tiny brush I filled in the candy corns with Cantaloupe, The Heat Is On and Pretty in Putty and then filled the skulls in with a large brush and Pretty in Putty. I then left the design to dry on the stamper for a minute or so, applied another layer of quick dry top coat and let it go tacky (about 5 seconds) then stamped on.

Spooky French Manicure // Candy Corn and Skull Negative Space French Mani Design

Spooky French Manicure // Candy Corn and Skull Negative Space French Mani Design

Polishes/Tools Used:-
Base:
- OPI Infinite Shine // Brightening Primer
- Nails Inc // Thirsty Nails (sheer pink)
- Ciaté Gelology // Pretty In Putty (off-white)
- Barry M // Wet Set Quick Dry Top Coat

Stamping:
- Whats Up Nails // Nether Noir (black)
- H&M // The Heat Is On (orange), Cantaloupe (yellow)
- Ciaté Gelology // Pretty In Putty (off-white)
- MoYou London Stamping Plate // Halloween 03
SHARE:

Tuesday, 7 September 2021

Quick Designs // Holo Monstera

Quick Nail Art Designs Holo Monstera Leaves

A quick look today! I bought an amazing Lina stamping plate during What's Up Black Friday sale last year (where does the time go) and I was playing around with it and came up with this quick look! I only did the index finger as I wasn't sure how it would turn out but I think I'll have to do the entire hand now.

Quick Nail Art Designs Holo Monstera Leaves

I love A-England polishes but they take so long to dry. For this effect I applied them to a silicone mat first, swirled them round together a bit then picked up the polish using a flat brush and applied it to the nail to achieve that drag marble effect. I'm no Sveta Sanders (she makes it look so easy) but I'm getting there. You need polishes that take a while to dry though for it to work well so A-England is the way to go but sitting there waiting for your nails to dry before you can stamp is painful.

Quick Nail Art Designs Holo Monstera Leaves

When the sun hits this design though the leaves come alive. This is why I love negative stamping designs because stamping polishes that look like that would cost an absolute fortune. It's still a beautiful look even without the sun though:

Quick Nail Art Designs Holo Monstera Leaves

Polishes/Tools Used:-
Base:
- A-England // Puck A Fairy (blue), Dragon (dark green), Fotheringhay Castle (olive green)

Stamping:
- What's Up Nails // Blanc My Mind (white)
- Lina // 4 Seasons - Summer 04 Stamping Plate
SHARE:

Monday, 26 July 2021

NailNerdChallenge July 2021 // Nautical Nails

Blue Teal Mermaid Nails NailNerdChallenge July 2021 // Nautical Nails

Mermaids are considered to fall under the "nautical" category right?? Well they do now because I love this look I did. 

Blue Teal Mermaid Nails NailNerdChallenge July 2021 // Nautical Nails

Blue Teal Mermaid Nails NailNerdChallenge July 2021 // Nautical Nails

It came about whilst I swatching some China Glaze shades and I couldn't help but stick a load of glittery toppers on Too Yacht to Handle. Negative stamps are also the best because I can only imagine a stamping polish like that would cost a fortune.

Blue Teal Mermaid Nails NailNerdChallenge July 2021 // Nautical Nails

For these nails I started out with 2 coats of Too Yacht To Handle followed by a layer of Diamond Glitter, then Will-'O-The-Wisp and dry brushed on alternate strokes of Crystal Blue and Pink Luxe. I then used born pretty stamping plate on my middle finger and Moyou on the rest. 

Polishes/Tools Used:
Nails:
- China Glaze // Too Yacht To Handle (teal)
- Barry M Nail Paint // Diamond Glitter (scattered holo)
- H&M // Will-'O-The-Wisp (green duochrome shimmer topper)
- Barry M Molten Metal // Crystal Blue, Pink Luxe

Stamping:
- What's Up Nails // Blanc My Mind (white)
- Born Pretty Stamping Plate // BP-109 (middle finger)
- MoYou London Stamping Plate // Sailor 04 (rest of fingers)

SHARE:

Wednesday, 21 July 2021

NailNerdChallenge July 2021 // Tropical Nails

Dark Blue Tropical Hibiscus Nails NailNerdChallenge July 2021 // Tropical Nails

So this was the first prompt but I forgot to post it, so here it is! Usually when I do tropical I go for a pink or peach background with green leaves so I decided to mix it up with some darker colours and bright pops! 

Dark Blue Tropical Hibiscus Nails NailNerdChallenge July 2021 // Tropical Nails

Dark Blue Tropical Hibiscus Nails NailNerdChallenge July 2021 // Tropical Nails

For this one I started out with a layer of Night Sky, then applied Deep Ocean, Dream Holiday and Turquoise Mint to a design on the Paradise 02 plate. Scraping the polish blends them all together and then I stamped that on top. Afterwards I used the flower designs from Paradise 05 first in white so the colours would pop more then used No Tan Lines, My Showcase Pink and Raspberry fro the flower details. The little yellow pollen stems had a white base stamp and then Maui Gold stamped on top.

Polishes/Tools Used:
Nails:
- Barry M Green Origin // Night Sky (dark blue)

Stamping:
- MoYou London // Dream Holiday (blue), Deep Ocean (deep blue), Turquoise Mint (mint)
- Maniology // Maui Gold (yellow)
- OPI Infinite Shine // No Tan Lines (orange)
- Barry M Nail Paint // 273 Raspberry
- Kure Bazaar // My Showcase Pink (fuschia)
- What's Up Nails // Blanc My Mind (white)
- MoYou London Stamping Plates // Paradise 02, Paradise 05


SHARE:

Tuesday, 13 July 2021

NailNerdChallenge July 2021 // Beach/Ocean Nails

NailNerdChallenge July 2021 Beach/Ocean Nails - Negative Space Ocean Wave Nails

So I didn't miss the first weeks challenge; I just never posted it. Lol, I'll do that now. So anyway, here is the next prompt; beach nails!

I wanted to do something different than my usual sunset gradient with silhouette palm trees and opted for this negative space wave look and I have to say wow. Not to toot my own horn but I think I knocked it out of the park lol.  This has to be one of my favourite looks that I've done and it took me less than 20 minutes. It's so simple that I could do it on my other hand (not that I'm going to but it's nice to have the option).

NailNerdChallenge July 2021 Beach/Ocean Nails - Negative Space Ocean Wave Nails

Overlapping plates are simply the best kind of stamping plates. Not all of us have the artistic talent of Lieve91 (and I probably never will) so I love that these plates come to my rescue. This little plate I got off eBay a while ago and the wave designs are perfect.

NailNerdChallenge July 2021 Beach/Ocean Nails - Negative Space Ocean Wave Nails

I started out with my favourite OPI base, then added a layer of thirsty nails. It's honestly the best polish for giving the perfect flush pink natural nails that look great in negative space looks. For the waves I applied little blobs of Lillian, Super-trop-i-cal-i-fiji-istic and I'm on a sushi roll to the plate then blended it all together when scraping. When picked up it creates a nice blend of shades which give more depth. I used normal polishes because I wanted some sheerness as water is see through after all. I then added on some white detail and applied a glossy top coat.

NailNerdChallenge July 2021 Beach/Ocean Nails - Negative Space Ocean Wave Nails

These are perfect no maintenance nails as you don't have to worry about growth too much and I love the splash of colour at the tips of my nails (sea what I did there?? and there??)

NailNerdChallenge July 2021 Beach/Ocean Nails - Negative Space Ocean Wave Nails

NailNerdChallenge July 2021 Beach/Ocean Nails - Negative Space Ocean Wave Nails

Polishes/Tools used:-
Nails:
- OPI Infinite Shine // Conditioning Primer
- NailsInc // Thirsty Nails (sheer pink)
- Revlon Colorstay // Diamond Top Coat

Stamping:
- Pict You Stamping Plate // PY-F001 (overlapping waves)
- What's Up Nails // Blanc My Mind (white)
- OPI Infinite Shine // Super Trop-i-cal-i-fiji-istic (deep blue), I'm On A Sushi Roll (teal)
- Zoya // Lillian (pale blue)
SHARE:

Tuesday, 15 June 2021

Starry Glow // Pink Shimmer Constellation Look

Starry Glow Pink Shimmer Constellation Look Kelli Marissa Plate


A quick look that I did back in April when I bought the Kelli Marissa plate from MoYou London. I actually wore this without a peel off base so it lasted me all week! It's rare I wear the same look for longer than 6 hours lol.
Starry Glow Pink Shimmer Constellation Look Kelli Marissa Plate


I knew when I saw the beautiful constellation designs on the plate that it would suit the heavenly shimmer from Give It A Glow.

Starry Glow Pink Shimmer Constellation Look Kelli Marissa Plate

Starry Glow Pink Shimmer Constellation Look Kelli Marissa Plate

Polishes and Tools Used:-
- H&M // Give It A Glow (duo-toned pink/green shimmer)
- What's Up Nails // Blanc My Mind (White)
- MoYou London // MYL x Kelli Marissa 04 Stamping Plate
- Revlon Colorstay // Diamond Top Coat
SHARE:
Blog Design Created by pipdig